
Version 21.1 has been released as Stable, implementing many exciting features including seven features requested by our users.
Click on a topic to read more.
- Major Features
- New eServices Features
- New Account Module Features
- New Treatment Plan Module Features
- New Manage Module Features
- New Sheets-Related Features
- New Features Related to Integrated Software

New Discount Plan features
We are continuing to develop and add new capabilities to Discount Plans. New additions in this version include:
Discount Plan Frequency Limitations
Frequency limitations can now be set for Discount Plans.
First, go to Setup> Treat’ Plan to edit your Treatment Plan Module Preferences. Enter the codes that apply to each category (exam codes, prophylaxis codes, fluoride codes, etc.).
Tech Tip: Discount Plan frequencies are blank by default. They will likely be the same as your regular Frequency Limitations (shown above the Discount Plan Frequency Limitations), so copying and pasting that will save time.

Next, go to Lists> Discount Plans. Double-click a plan to edit, and enter the number of services in each category that will be allowed for this Discount Plan. (i.e. How many prophys a patient can have at the discounted price per year.) If there is no limitation, the field should be left blank.
TECH TIP: Entering a zero (0) will indicate that there is no coverage for that category.

Much like insurance plan frequency limitations, the Treatment Plan Module will show if the patient has reached the frequency limitation. Once this occurs, the full balance for the procedure will be pushed to the patient.

Discount Plan Annual Maximums
Discount Plan Annual Maximums are calculated by taking the Office Fee Schedule (UCR) and subtracting the Discount Plan Fee Schedule, giving the total discount amount the patient can receive annually.
To set an Annual Maximum, go to Lists, Discount Plans, and double-click to open a plan.

Enter the Annual Maximum amount (the maximum discount the patient can receive each plan year) and click OK to save.
TECH TIP: Annual maximums are calculated from the effective date of the plan. If an effective date is not entered, it will follow a calendar year. This means that if no effective date is entered to a Discount Plan added in mid-year, the annual max will reset in January, potentially giving the customer more of a discount than you may have intended.

Discount Plan Notes and Subscriber Notes
Plan Notes and Subscriber Notes can now be added to Discount Plans.
Plan Notes are added in Lists> Discount Plans. Double-click to open the plan, and add Plan Notes.
Subscriber Notes are added in the Patient’s Family Module. Open the Discount Plan for the patient, and add notes.

Discount Plan ID Number
Every Discount Plan is automatically assigned an ID number that appears at the top of the Edit Discount Plan Window. This cannot be changed.

Treatment Credits (Tx Credits) for Payment Plans include Discount Plan Adjustments
When adding Treatment Credits to a Patient Payment Plan for Discount Plan procedures, the Rem Before amount will automatically include Discount Plan Adjustments. (Discounts added manually using the Discount button in the Treatment Plan Module will not be included.)

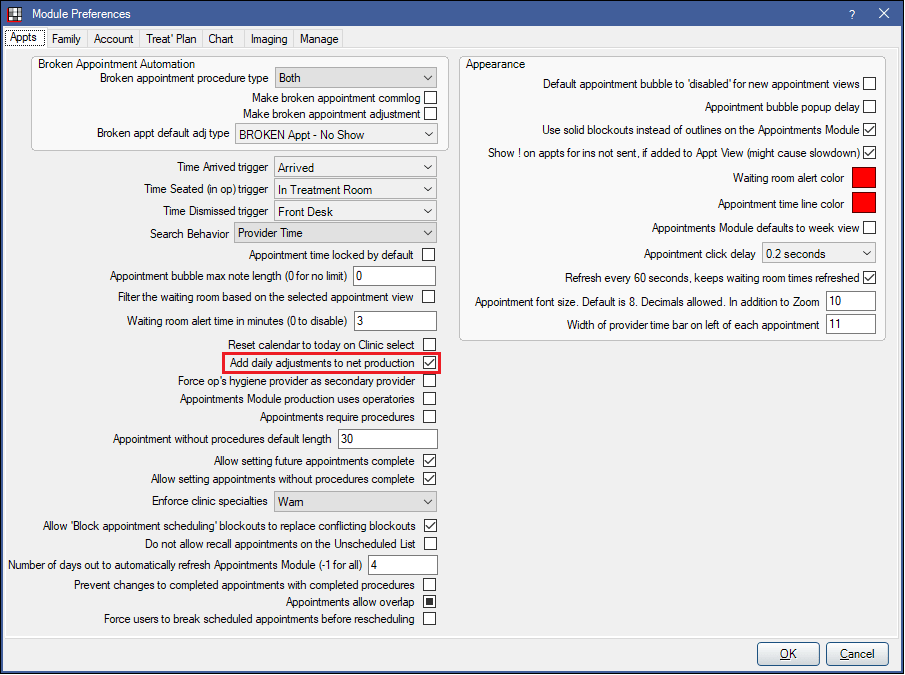
Net Production includes Discount Plan Adjustments
When the Appointment Module Preference “Add daily adjustments to net production“ is checked, Net Production will now take into consideration Discount Plan Adjustments, giving your practice an even better idea of the actual production for the day.

Open Dental Mobile
If your practice is using Open Dental Mobile, you can now run reports to verify information right from your mobile device.

Treatment Plan Can Show SalesTax Estimates
When you have set up requirements for Sales Tax, patient balances for procedures that are marked “Is Taxed” will automatically include the tax estimate. If you would like to show this tax estimate in the Treatment Plan, you can now add the Tax Estimate Display Field from Setup> Display Fields> Treatment Plan Module.

Once added, the Tax Estimate will show in a separate column on the Treatment Plan.


Web Sched Recall
- Web Sched Recall will send one recall reminder for a family if the Group Families box is checked in Recall List.

Mass Emails
- Mass Emails can now be sent from your office’s own email address. A few setup steps are needed.
1. Add your email in Email Setup if it’s not there already.
2. Go to Tools> Hosted Emails. (You can also go to eServices> Hosted Emails.)

3. Click Sender Addresses. This is where you will begin the verification process for their Hosted Email, or check the status of a previously added email address.

4. Click Add to add a new Hosted Email. Only email addresses in the Email Setup window appear here. Select from the list of emails, then click OK.

5. An email containing a link to complete the verification process will be sent to the selected email address. Once the instructions in the emailed are followed, the verification process will be complete and the email will be ready for use.
eConfirmations Generate an AutoReply if they Fail
- When sending eConfirmation messages, if AutoReply is enabled in eConfirmation setup, patients will now receive a text message if their appointment fails to confirm. The message will say “There was an error confirming your appointment with [OfficeName]. Please call [OfficePhone] to confirm.”

eService Activity Log
- A new eService Activity Log tracks all eServices actions by the patient or the system.
Some examples of tracked actions include:
– A patient logged into the Patient Portal
– An appointment was confirmed
– A form was created within eClipboard
– A patient scheduled an appointment via Web Sched


Dynamic Payment Plans Can Include Treatment Planned Procedures
Treatment Planned Procedures can now be added to Dynamic Payment Plans.
Your practice will need to determine how to view treatment planned procedures. The selected option will determine how treatment planned procedures are handled and how the account will look.
The options are:
Await Procedure Completion
or
Procedures as Complete

When Await Procedure Completion is selected:
- Treatment planned procedures are not included in the Amortization Schedule until they are set Complete.
- Treatment planned procedures will not display on printed payment plans.
- You may need to have the payment plan re-signed by the patient each time work is completed.
- PayPlanCredits are only added for completed procedures, so the account balance only deducts the amount of the payment plan for completed work.
When Procedure as Complete is selected:
- Includes treatment planned procedures in the Amortization Schedule.
- Treatment planned work displays on printed payment plans.
- PayPlanCredits are also added for treatment planned procedures, so the account balance will show a credit until the work is complete.
Your practice will want to standardize on one way this is consistently handled for all of your plans to avoid office staff confusion.

Users no longer need to have the Insurance Payment Create security permission to enter insurance payment estimates on Preauthorizations.


Right-click options in Tasks
Tasks have had the ability to link to wiki pages and external web links, but now, you can right-click in the description to go to a patient or to another task.

Here are all the right-click link options:
- PatNum: Select the patient in Open Dental. Enter the patnum immediately after the colon. (e.g. patnum:25)
- TaskNum: Open the task in a new window. Enter the task number immediately after the colon. (e.g. tasknum:96)
- A UNC path that opens a folder in File Explorer or a document/file if the full document name is entered.
- UNC paths must end in a file or a backslash like shown above.
For example \\Server\OpenDentalExports will not work, but \\Server\OpenDentalExports\ will take you straight to the exports folder. If a folder name contains punctuation or special characters, the folder may not open. - If linking to a document/file, the full name (including the extension) is needed.
For example: \\Server\OpenDentalExports\Sample.docx for a Microsoft Word document.
- UNC paths must end in a file or a backslash like shown above.
- Web: Open a URL in your default web browser.
- Wiki: Open the corresponding wiki page. Enter the page name in two brackets (e.g. [[page name]])

- The Static Text Field apptProcs can now be added to patient and referral letters. When added, this field will display the procedures associated with the selected appointment along with the description and surfaces.
 See our Introduction to Sheets Webinar for more on customizing sheets.
- If you are a multi-location practice and use customized Treatment Plan Sheets, this one’s for you.
In Sheet Def Defaults (Setup> Sheets> Defaults), a specific Treatment Plan sheet can be set per Clinic.


Here are a few new features that were introduced for integrated software products.
DoseSpot
- Patient information updated within Open Dental also updates the patient in DoseSpot.
CareCredit
- A new Batch Transactions tab shows the status of batch Quickscreen transactions in a date range.
TSI Collections

- The Account Receivable Manager grid can now be printed or exported.
- If you are a multi-location practice using the Clinics feature, use the Clinics button in the upper left to see the list for that Clinic.
EDS
- Electronic Statements are now batched into a single file.
We are continuing to develop exciting features, many of them requested through our Feature Request process. If you need help with the features highlighted here or with anything else in the program, please reach out to our support team.