

The financial health of your practice depends on you being attentive to your receivables, both patient and insurance. In this post, we will help you effectively use the Outstanding Insurance Claims Report. This is much more than just a report you run – it’s an interactive tool to help you manage the money owed to you by insurance!

Filtering the Report
When first opening the report, it is filtered by your (the logged-on user’s) default clinic, if any, and 30 Days Old (min). If users are assigned to claims, then they can easily filter the report by the claims assigned to them by clicking Mine. Because the report is meant to follow up on claims that have been outstanding for a certain period of time, your practice may have a certain threshold of when they choose to follow up on claims, and that may even change by carrier. Change the Days Old or even search claims that are outstanding from a particular calendar date range by clicking the Date Range tab and entering specific dates. Enter a carrier name in the Carrier filter. This doesn’t need to be the full name.
Other filters include:
- Date Range Applies To: Determine which date the date filters apply to.
- Treat Prov: Filter the results by claim treating provider.
- Preauth Options: Choose to filter out preauths, include preauths, or show only preauths.
- (We will discuss Custom Tracking in a later section.)
After setting filters. Click Refresh to update the results in the grid.
Assign Users
This feature is especially helpful for larger practices where you may have multiple staff members following up on outstanding claims. Assigning users to specific claims will help prevents multiple staff members from following up on the same claims and repeating the same work. You may wish to assign users by clinic, carrier, claim type, or any other factor, but the method is the same.
To assign a user to a claim (or preauthorization), select claims from the grid and click Assign User, select the user to assign to the claims, and click OK.
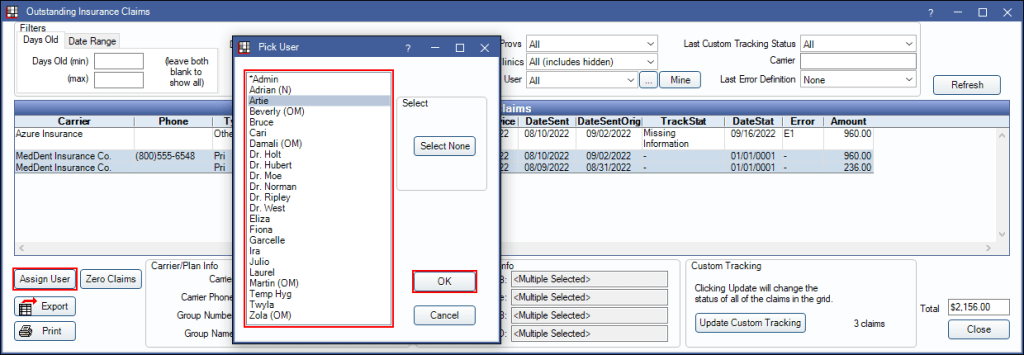
Alternatively, you can right-click on selected claims and select Assign User or Assign to Me.
Following up on Claims
From the Outstanding Claims Report, everything you need to follow up on a claim is at your fingertips. In the Claims grid, the Claim Amount, Date of Service (DateService,) and DateSent are listed for easy reference. Select an item from the list and the patient’s insurance information will populate at the bottom of the window.
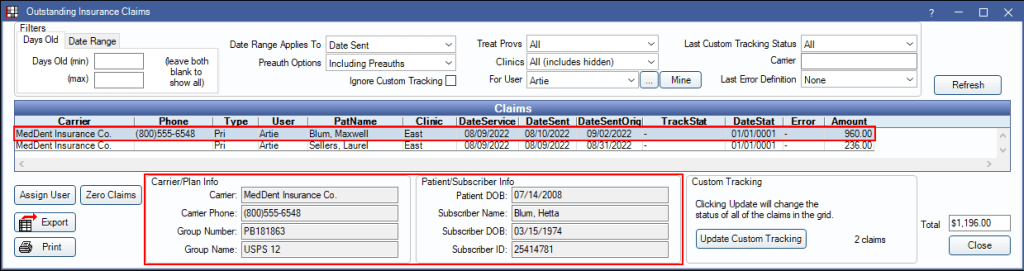
Staff can now easily contact insurance carriers and have all the information at hand. They can quickly access the full claim (or preauthorization) by double-clicking a claim in the grid. From there, they can update claim information and re-send the claim or update the custom tracking status or even receive the claim. Right-click on an item for additional options.
Claim Custom Tracking
Claim Custom Tracking Statuses can be used to update the status of claims that have been outstanding and you have contacted the carrier about. They can also be used to suppress the claim from appearing on the Outstanding Claims Report for a number of days, say if the carrier advised the claim has been delayed, so staff waits before following up on the claim again.
Your practice can begin using Claim Custom Tracking by creating statuses in Definitions, Claim Custom Tracking .

Add a Day Suppressed to prevent the claims from showing on the Outstanding Claims Report for a number of days (unless the Ignore Custom Tracking box is checked in filters). Common Custom Tracking statuses include: On Hold, Risk Manage, Review, etc. Your practice can create Claim Custom Tracking statuses for whatever you need.
Additionally, you can add error codes that you may get from carriers that can be added when updating Custom Claim Tracking. These can be added in Definitions, Claim Error Code.
When following up on claims, staff can update Claim Custom Tracking for all claims in the grid by clicking Update Custom Tracking.

Select a Custom Track Status and Error Code (if applicable), and add any additional notes. Click Update to add the Custom Tracking Status will be to all claims that were in the grid when the button was clicked (not just selected claims).
To only update the Claim Custom Tracking of a specific claim, double-click the claim from the grid, and go to the Status History tab.

Click +Add, then enter the Custom Track Status and Error Code (if applicable), and add any additional notes. Click Update to add the Custom Tracking Status Update to the claim. Repeat this process for any other claims you wish to update the status of.
When claims have been assigned a Custom Claim Tracking status, they can be filtered by this status in the Outstanding Claims Report. For example, when you’re calling and following up on claims, you probably don’t have time at that very moment to fix any issues right then and there, so you can go back to the report and filter by a particular Last Custom Tracking Status or Last Error Definition to quickly find the claims that need attention.
Zeroing Claims
Turns out insurance isn’t paying on claims? Has the Patient reached their annual max or they’re no longer covered by the plan? If you’ve updated Open Dental to version 22.3, there is now an easy way to receive claims with no insurance payment or write-offs.
Note: Users must have the Security Admin permission to use the following feature.
Select the claim(s) you wish to receive with $0 in the grid and click Zero Claims.

You will receive a warning prompt. Verify only the claims you wish to receive with $0 are selected.
CAUTION: If you did not select any claims, all claims in the list will be zeroed out.
Once you’ve verified, click OK on the message. The selected claims will be removed from the Outstanding Claims Report and marked Received with No Payment or write-offs.

For a guide with quick tips and helpful links for effectively using the Outstanding Insurance Claims Report, click the thumbnail below to view our helpful infographic.

Now you’re ready to successfully and effectively manage your outstanding claims from Open Dental! As always, if you have questions, contact our Support Team.