

If your practice offers in-house or Discount Plans, Open Dental has the tools to help streamline and automate the process so staff doesn’t need to manually apply discounts or override them once a patient exceeds discount amounts. In this post, we’ll walk you through each step of the Discount Plan creation process, providing you with all the information you need to build effective plans that work for your practice. So let’s get started!
Create a Discount Plan Fee Schedule
If your patients are on a Discount Plan or in-house plan, then that comes with discounted fees, the first step to automating this in Open Dental is to create the Discount Plan Fee Schedule. Go to Lists, Procedure Codes to get started. We’ll start by creating a new blank Fee Schedule.
- Click Fee Scheds
- Click Add to create a blank fee schedule
- Enter a description (i.e., name) and select Type, Normal
- Click OK to save
- Close the Fee Schedules list

Copy Fees
If you have totally custom fees for your discount plan that are not a percentage discount of your UCR/Office Fees (or another fee schedule), then from here, select the newly created Fee Schedule in one of the Fee 1/2/3 dropdowns and start entering your fees manually, otherwise, if most of your procedures are discounted a percentage (e.g., 20%) from your UCR fee, we’ll copy fees to the new Fee Schedule.
- In the Procedure Codes window, click Fee Tools
- In the Select Fees area, choose the Fee Schedule to be copied (e.g., Office Fees)
- If using non-global fees (i.e., Fee Overrides for Provider or Clinic, also select Clinic and Provider criteria as needed)
- In the Copy To area, choose the Fee Schedule where fees will be copied (e.g., Discount Plan Fee Schedule)
- If using non-global fees (i.e., Fee Overrides for Provider or Clinic, also select Clinic and Provider criteria as needed)
- Click Copy
- Verify selected Fee Schedules, Clinics, and Providers. If copying into an existing Fee Schedule, instead of a blank Fee Schedule, current fees will be overwritten. If you are sure you want to proceed, click OK on the warning.
- Copying may take a few moments. Once complete a Done message appears. Click OK to close.

Apply a Discount to New Fee Schedule
Now that fees have been copied to the new Fee Schedule, we can apply a percentage decrease to those fees.
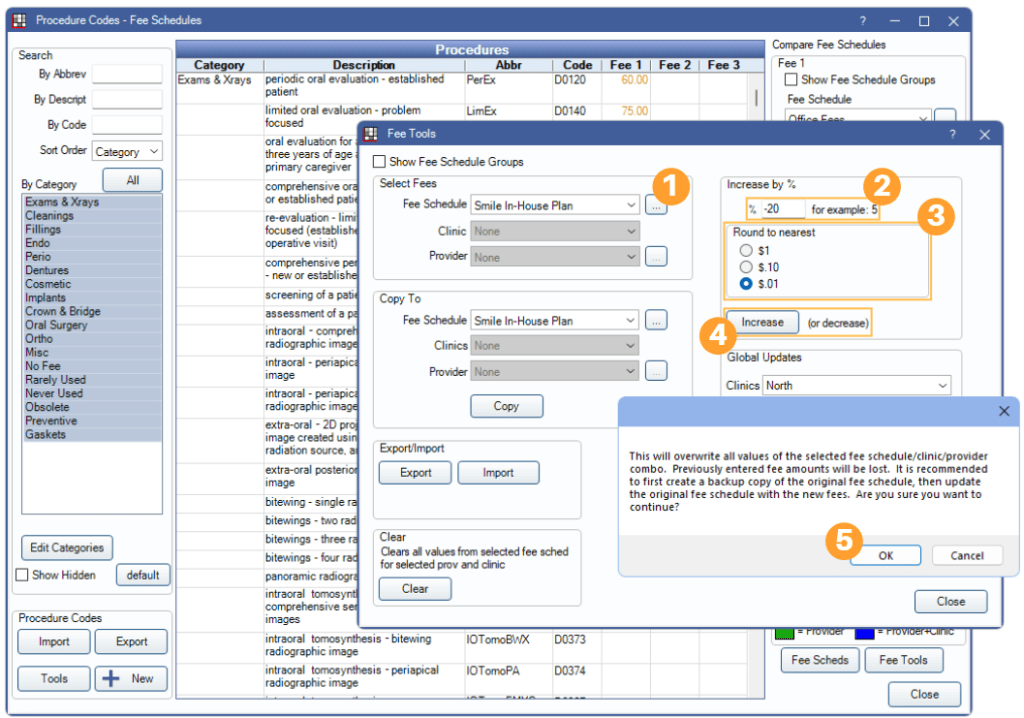
- In the Fee Tool window Select Fees area, choose the Discount Plan Fee Schedule
- If using non-global fees (i.e., Fee Overrides for Provider or Clinic, also select Clinic and Provider criteria as needed)
- In the Increase by % area, enter the discount percentage as a negative number in the % box (e.g., -20)
- Select a Round to nearest method of your preference
- Click Increase (don’t worry, because we entered a negative number, this will actually decrease the fees)
- Confirm the selected Fee Schedule, Clinic, and Provider in the Select Fees area. All fees for the selected combination will be overwritten. If you are sure you want to proceed, click OK on the warning.
- Fee changes may take a few moments. Once complete a Done message appears. Click OK to close.
Edit Fees as Needed
Your in-house plan may not just be one flat percentage discount – and that’s totally fine! Once you’ve copied fees and applied the discount, you can easily go into the Fee Schedule and manually edit individual procedure fees. For example, if Prophys are covered at no cost, select your Discount Plan Fee Schedule in one of the Fee Schedule dropdowns and zero out the fee for the Prophy procedure code.

Create Discount Plan Adjustment Type
Now that the Fee Schedule is all sorted out, we need to create an Adjustment Type for the Discount Plan.
- Go to Setup, Definitions
- Select Adj Types
- Click Add
- Enter a name
- Enter dp for the Adj Type (in the second box)
- Click OK

Set Frequency Limitations
If there are procedures that you only want patients to receive a limited number of discounts on, these can be set up as Discount Plan Frequency Limitations in Preferences. For example, if prophys and exams are discounted to $0, enter the procedure codes in the Exam and Prophylaxis categories, once the patient exceeds the number of exams or prophys set up in their Discount Plan (we’ll get to that a bit later), the UCR fee will be used instead.

Set up the Discount Plan
Now that you’ve done all the prep work, you’re ready to set up the Discount Plan!
- Go to Lists, Discount Plans
- Click Add
- Enter a Description (name) for the Discount Plan
- Click […] to select the Discount Plan Fee Schedule that we created earlier
- Select the Discount Plan Adjustment Type from the dropdown
- Enter any additional details as needed. The below fields are options.
- Plan Note: Informational only
- Annual Max: Annual maximum discount. Once a patient meets the max, they no longer be charged the discounted fees.
- Frequency Limitations: Requires codes entered in Preferences. Once a patient has met the limitation, procedures are no longer charged at the discounted rate.
- Click OK to save the Discount Plan.

Start Using the Discount Plan
Now that the Discount Plan is set up, you can start using it!
Assign the Discount Plan to Patients
To connect a Discount Plan to a patient, click the Discount Plan button in the Family Module, then select the Discount Plan you’d like to apply to the patient and click OK.
TECH TIP: Discount Plans can only be added to patients who do not have insurance. If your patient still has an insurance plan listed, but coverage has lapsed, double-click the plan and Drop it. This will not affect any outstanding claims.
Enter any subscriber details, including the Effective Dates. These are important if you’re utilizing the Annual Max or Frequency Limitations. If you don’t enter an Effective Start Date, the Annual Max and Frequency Limitations will not reset annually. Once you’ve entered any details click OK to save.

The Discount Plan details appear in the same spot insurance plans would in the Family Module.

Applying the Discount
You’re now ready to use the Discount Plan. Since everything is set up and the Discount Plan is attached to the patient, discounts are applied automatically. From the Treatment Plan, you can see discount amounts in the DPlan column. The Discount Plan Annual Max, Adj Used, Adj Remaining are also noted on the right-hand side (in the same area as Ins Remaining Calculations)

Once procedures are set complete, they will be billed out at the UCR fee and an adjustment is automatically created for the difference between the billed fee and the Discount Plan fee. This should match the DPlan amount seen in the Treatment Plan.

Additional Tools
You’ve finished setting up the Discount Plan, but there are a couple of other steps that may be helpful when administering an in-house plan. If your in-house plan incurs a charge each month, set up a Repeating Charge to automatically post the charge to the patient’s account.
If you’re using a supported credit card processor, you can also automatically process payments to the patient’s credit card by Authorizing Recurring Charges.
Offering Discount Plans can be a powerful tool for attracting new patients and retaining existing ones. With Open Dental, you have the ability to create custom plans that reflect your practice’s unique needs. By taking advantage of this feature, you can help ensure that your patients receive the care they need at a price they can afford, all while streamlining your billing and administrative processes.
If you have questions, our Support Team is available to assist you. Don’t hesitate to reach out!
Information in this post reflects features available in Open Dental Version 23.1. For the most up-to-date information, please visit our manual.